Blood Collection Simulated Laboratory
What is the blood collection lab demostrating?
The simulated blood collection lab is an activity for educating and teaching students how to extract a blood sample from the jugular vein on cattle. This simulation allows students to experiment with assessing the components of blood wihin the sample that they extracted. With the simulated lab, there is an additional lab plan that can be used with live animals. If you are using the live animal lab plan, have access to the materials and equipment. Materials for the live animal lab plan are not provided in the kits that are available to check out.
How do I teach this simulated lab?
- First, a model of the blood components must be created (Blood plasma and white blood cells).
- The oil will represent the blood plasma and the water will represent the white blood cells. (Do not shake either of this materials)
- Next, students will simulate how to draw blood from the jugular vein.
- Cutting a 5″ strip of 1″ wide elastic will represent the muscle/fat tissue.The elastic give great tension and movement just like a muscle would.
- Students will then clamp the vinyl tubing, mix the food coloring and corn syrup in a syringe and fill the tubing with the food coloring and corn syrup and then clamp the other end of the tubing. This will represent the jugular vein of a cow.
- The elastic will then be placed on top of the tubing to represent the muscle/fat around the vein.
- The felt square will then be used in representation of the cows skin/hide.
- felt- skin/hide
- elastic- muscle/fat
- tubing-vein
- corn syrup/food coloring- blood (this will represent the red blood cells)
- Then, students will need to put on their nitrile gloves for safety measures.
- students will then draw out the “blood” created from the previous step. Make sure to unclasp the clamps on both sides so that a vacuum is not created when drawing the “blood”.
- students will then need to slowly depress plunger to expel corn syrup and water in test tube that was previously prepared (do not shake or mix).
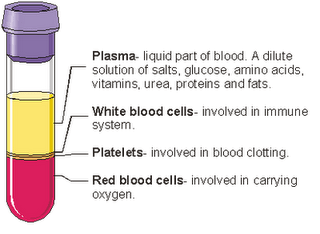
- In a real life scenario, inserting the test tube into a centrifuge will separate the blood sample from the cow, where students can then analysis the test tube. An example of a blood sample after being in the centrifuge is as follows:
Lesson plan:
To access the lesson plan for the simulated lab, please click on this link provided: Lesson-Plan-blood-collection-2-18y0vix
Below is a video recording of the lesson being demonstrated:
Materials List:
- Syringe (10mL)
- Lu-er Lock Syringe(10mL)
- 1″ 18 gauge hypo needle 18G X 1″ A
- IV vein tubing
- Clamps for tubing
- 1″ white elastic
- Water + red food coloring
- Felt square
- Vegetable oil
- Test tubes – 3mL
This is simulating a blood collection lab taught by Dr. Powell and Dr. Rosencrans. For additional information on content for Dr. Powell and Dr. Rosencrans lab, please visit the Supplemental Resources tab!


