This page has instructions for migrating a site from wordpressua.uark.edu to WordPress.com.
Step 1: Create a site on WordPress.com
- Go to wordpress.com. Click on “Start your Website” or “Create a Site.”

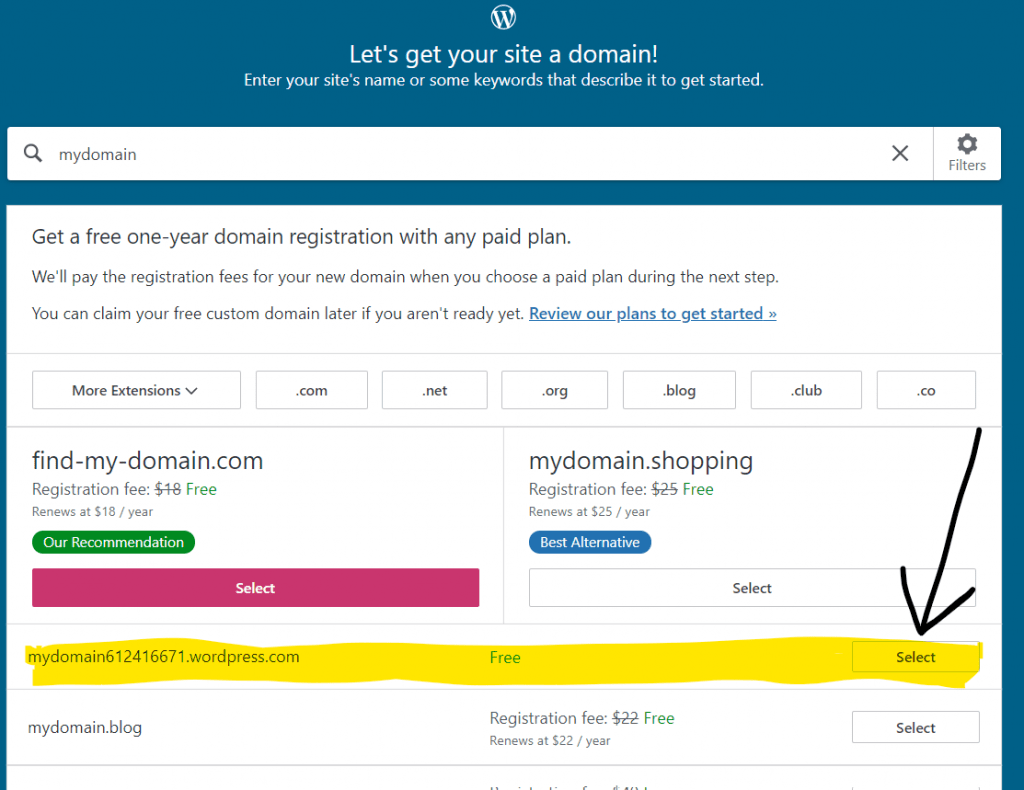
- As you type in a domain, you will see the options for paid and free sites. The option at the top of the list is free, and other options may be free for a year, but will require payment later.
- WordPress will append numbers to the domain you provide to create a unique domain, but if you keep trying different options, you might be able to create a domain that is unique without adding numbers.

- You will see a choice of hosting plans, which offer different services. If you want a free site, click the link above the different plans. It’s labelled “Start with a free site.”

- Enter your email address to set up an account, and follow the instructions to start working on your site.
Step 2: Export your site from sites.uark.edu
- Log into the your site on wordpressua.uark.edu and go to your Dashboard
- Under “Tools” in the left menu, select “Export.”

- Choose the content you want to export. We recommend exporting “All Content.” If you want to export only pages, images or posts, you will need to enter the date range for the content and export each type of content separately.

- Click on “Download Export File” to save the file to your computer.
Step 3: Import your content
- Go to your WordPress.com site.
- Click on “Tools” in the left menu of the dashboard and select “Import.”

- Select “WordPress” from the list of places to import a site.

- Click on the link to upload an export file. Do not enter your site URL in the box below this link, because that will result in an error message.

- When prompted, upload the file you downloaded in Step 2. After that, WordPress will show you how it will rename authors on your site, so that all the content on your new site will be listed under your WordPress username. Click “Start Import.”
- Importing your content will take a few minutes, or longer if you have a lot of files. You will get an email when it is finished.
Step 4: Clean up your site
- Many of our WordPress sites use a theme called Divi. If your site uses Divi and you want to continue to use it, you’ll need to purchase a premium WordPress plan and pay for the theme. Click on “Design” in the left menu, then choose “Themes” and click on “Install theme” for instructions on this.

- Alternately, you can select a free theme from the Themes list. This will mean you will need to redesign any pages created with Divi. This probably includes your homepage.
- Divi pages from your sites.uark.edu site will have some extra code that appears as text. An example of Divi code looks like this:
[et_pb_row _builder_version=”3.25″ background_size=”initial” background_position=”top_left” background_repeat=”repeat”][et_pb_column type=”4_4″ _builder_version=”3.25″ custom_padding=”|||” custom_padding__hover=”|||”][et_pb_image _builder_version=”4.0.11″ src=”https://sites.uark.edu/camillas/files/2020/06/cat.png” hover_enabled=”0″][/et_pb_image][et_pb_text _builder_version=”4.0.11″ background_size=”initial” background_position=”top_left” background_repeat=”repeat” hover_enabled=”0″] - Erase these blocks of code from your pages. Then you can use the WordPress editor to add any images or other design elements back to your page.
- If your site uses our other theme, called CampusPress Flex, your site should look look fine in any other theme. CampusPress Flex is not available on WordPress.com, but there are many similar themes that you can choose from.
- All the images from your old site should appear in your media library. If any images are missing, you can download them from your wordpressua.uark.edu site by activating the Bulk Media Downloader plugin. Once the plugin is active, go to your media library and you will be able to download any images you need. Then you can upload them to your new site.
If you have questions, email wpress@uark.edu.
